Setup of Swagger UI for Spring Boot application proxied by the Nginx server
The access to REST-based application services or microservices that are bound by a business domain is usually protected by authentication. To access such APIs and it’s documentation (typically in Swagger), you need a valid token. However, what if the documentation needs to be public and the REST APIs still need to be authenticated and authorized? In this tutorial, we are going to see how we can configure the Swagger documentation for a Java 8 application that is proxied behind the Nginx server while keeping the REST APIs still authentication protected.PREREQUISITES: Maven 3.x, Java 8 Create a spring boot project either by using IDE or from here Wherein inside pom.xml these two dependencies are default by its versions.

Now let’s add a bean class here. We will be using Lombok annotation for the bean class, which will avoid some boilerplate code of getter, setters, and the constructor

Now let’s create a Person class (a sample entity)

Now let’s create a Controller.

Here is the annotation used as @RestController is present in this dependency and this dependency in pom.xml

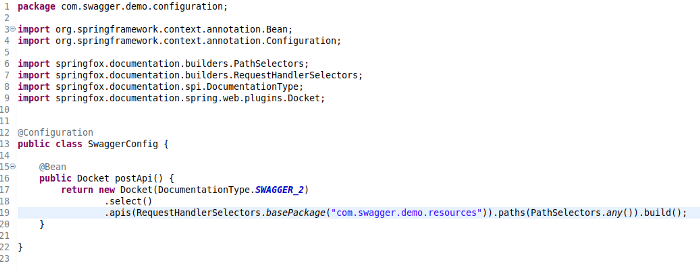
Now we will add some configuration to swagger class. Create a SwaggerConfig class. Before you do that, you will need to add the dependency of swagger in pom.xml.


Add this repository tag under the project tag in pom.xml.
Let's create a SwaggerConfig class
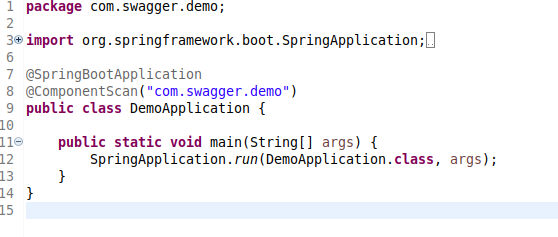
The main class will be
Add a prefix for swagger in the application.properties. which will help in accessing the swagger-resources when using authentication and authorization on the network level.

The folder structure of the project is as below:

Now let’s install the Nginx server. Start with updating the package information:
sudo apt update --- updateAfter that install the Nginx server on Ubuntu Machine
sudo apt install nginxFor installing on Centos, Windows. Edit the conf file of Nginx”
sudo nano /etc/nginx/nginx.confAdd the following lines in the conf file:-
server {
listen 80;
server_name localhost;
access_log /var/log/nginx/host.access.log main;
charset UTF-8;
sendfile on;
tcp_nopush on;
tcp_nodelay on;
keepalive_timeout 65;
types_hash_max_size 2048;
server_tokens off;
include /etc/nginx/mime.types;
default_type application/octet-stream;
#server_names_hash_bucket_size 128;
client_max_body_size 7M;
max_ranges 8;
gzip on;
gzip_http_version 1.1;
gzip_disable “MSIE [1–6]\.”;
gzip_min_length 256;
gzip_vary on;
gzip_comp_level 6;
gzip_buffers 16 8k;
gzip_proxied any;
gzip_types text/plain text/css application/json application/javascript application/
x-javascript text/xml application/xml application/xml+rss text/javascript;
root /usr/share/nginx/html;
index index.html index.htm;
location /service-path-uri/api-docs/ {
proxy_pass http://service-path-uri:8080/api-docs/;
}
location /service-path-uri/v2/api-docs {
proxy_pass http://service-path-uri:8080/v2/api-docs
}
}
In this conf file, V2 is the version of the Spring Fox Swagger documentation. Where here it contains the JSON format data of description APIs.
Here proxy_pass is used for reverse proxy. It sends the request to a specified proxied server, fetches the response, and sends it back to the client. Mainly to use Nginx when you have a standalone server where you can run your service behind Nginx.
Also, you can visit the documentation of Nginx and see how to play around with it here
For loading, swagger goes on to http://localhost:8080/api-docs/swagger-ui/
With NGINX Plus it is possible to control access to your resources using JWT authentication. JWT is a data format for user information in the OpenID Connect standard, which is the standard identity layer on top of the OAuth 2.0 protocol. Deployers of APIs and microservices are also turning to the JWT standard for its simplicity and flexibility. With JWT authentication, a client provides a JSON Web Token, and the token will be validated against a local key file or a remote service. Which will help us to use it for protecting APIs?
Here is the configuration link which will help us, how to configure Ngnix.
