Using Swagger for Creating a PingFederate Admin API Java Wrapper
Get started with PingFederate by exploring a side utility and two sample applications that demonstrate Authorization Code Flow.
In my previous articles listed below, I have shown how to use Swagger, especially the Springdoc implementation. for doing the code first/bottom-up approach.
- OpenAPI 3 Documentation With Spring Boot
- Doing More With Springdoc-OpenAPI
- Extending Swagger and Spring Doc Open API
This time I am writing about the design first/top-down approach. I am not writing about the usual generated Java server, and say, associated Angular TypeScript client code; but first, some background context.
Background
Some time back I had the opportunity to use PingFederate to solve a business problem for a client of mine(no details due to NDAs). This involved working with the US government’s SSN verification web service and leveraging OIDC for this purpose.
The actual code I wrote was just a few Spring Boot classes. The project was more about architecture, integration, infrastructure, etc.
When working on this project, I created a side utility.
Highlights
- This is the first time in the PingFed world such a utility has been created.
- There are some innovative concepts in it.
- Creating it had some challenges.
- We will discuss them along with how they were overcome.
What Does This Article Offer to the Reader?
- Speeds up getting the reader started on PingFederate
- Introduces my utility that helps in meeting this above objective
- Also showcases two sample applications that demonstrate the Authorization Code Flow: These sample applications are used to demonstrate the effectiveness of our PingFederate configuration. Of particular interest to the reader will be the application that demonstrates my attempt at the authorization code flow using the BFF pattern for the Spring Boot and Angular applications.
Note: While these sample applications have been tuned for PingFederate, it should be easy to tweak them for other OIDC providers like Okta, Auth0, etc.
Also note: When working on my client's project, there was no front end. It was a machine-to-machine communication project. That said, for most readers, it would be more relevant to have a front end in the examples. Therefore, the two examples do have a front end.
A Quick Swagger Recap
It supports both the code first/bottom-up and design first/top-down approaches.
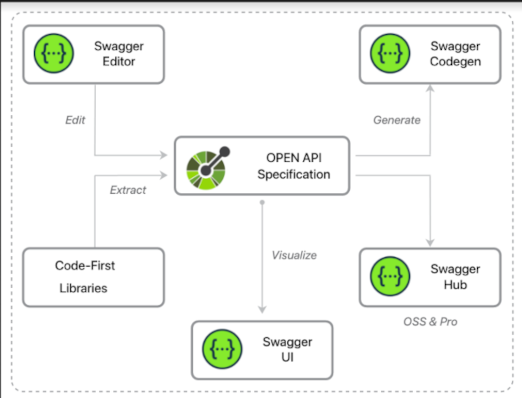
- A Swagger document can be created by using:
- Swagger Editor
- Code first libraries like springdoc, SpringFox, Swagger Core, and related libraries that can introspect the actual code
- The Swagger YAML/JSON document can be visualized using the Swagger UI. This UI is also exposed by the springdoc and SpringFox libraries.
- Swagger Codegen can be used to generate server/client code.
- Lastly, there is the SwaggerHub, which leverages all the Swagger tools and offers much more when using the Design First/Top Down approach.
What Is PingFederate?
PingFederate describes itself as follows:
"PingFederate is an enterprise federation server that enables user authentication and single sign-on. It serves as a global authentication authority that allows customers, employees, and partners to securely access all the applications they need from any device. PingFederate easily integrates with applications across the enterprise, third-party authentication sources, diverse user directories, and existing IAM systems, all while supporting current and past versions of identity standards like OAuth, OpenID Connect, SAML, and WS-Federation. It will connect everyone to everything."
In my limited context, I used it for OIDC and OAuth purposes.
While on the subject of PingFederate, it is not a free product. That said, you can always download and use the latest version of Ping products for free. Trial license files are available. I was able to keep getting new trial license files as needed. I found it very easy to learn.
I used PingFederate because, in my client project, some requirements were met better by PingFederate than, say, its cloud-based alternative.
What Is the Problem Definition We Are Trying To Solve?
Problem Definition:
PingFederate Admin API can be used for automating its setup configurations in addition to doing it manually by the admin console.
The lack of any programmatic language wrapper makes it hard to administer/configure automatically.
Elaborating on the point, just to illustrate the problem: AWS provides SDKs in various programming languages. These SDKs sit on top of the underlying web service API.
It's always easier to use the AWS SDK than work with the underlying web services using Postman/cURL.
Similarly for PingFederate
A Java Wrapper was achieved:
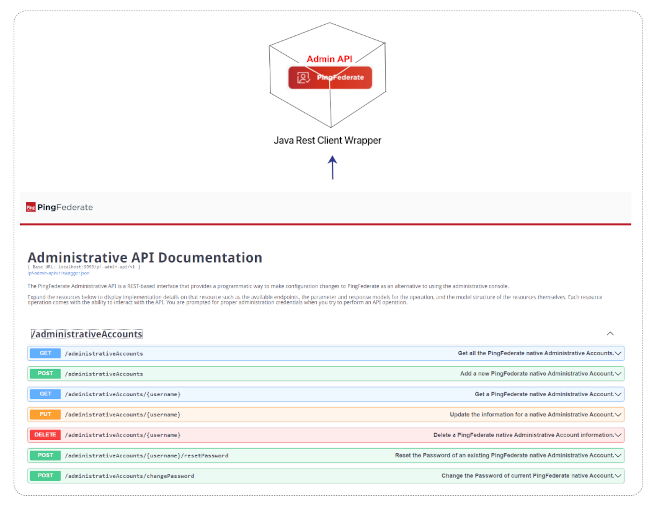
Note: This has been done for the first time in the PingFederate world. :)
It is also possible to achieve this in other languages if needed.
Is This All That We Did?
Is all we did run a Maven-based code generator that reads Swagger specifications of PingFederate Admin API to generate some code and use that? Yes and No.
High-Level Solutioning
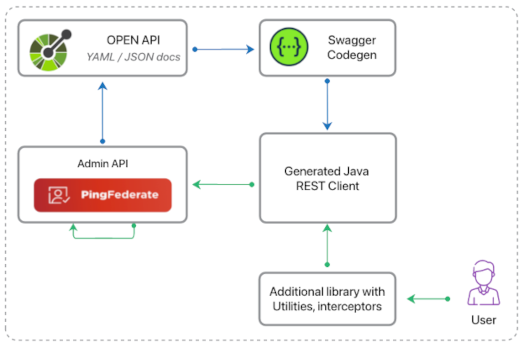
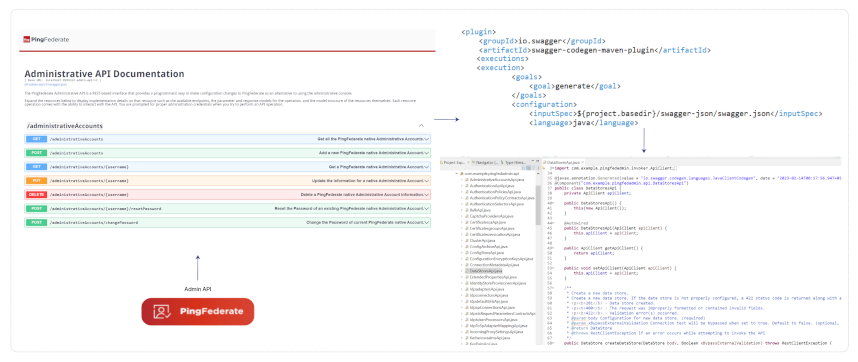
Here, we have 2 flows represented by blue and green arrows.
- The blue arrows demonstrate:
- The use of Swagger Core and related code-first annotation-based libraries, causing the automatic generation of the Swagger YAML/JSON Admin API document; this is part of PingFederate itself.
- This Swagger document is leveraged by the code generator to generate actual code. In our case, we are generating Java REST client code.
- The green arrows demonstrate:
- The user interacts with our library: additional convenience code and a particular rest template interceptor.
- This in turn invokes the generated code.
- Finally, the PingFederate Admin API is invoked which changes/configures PingFederate.
- Hurdle in getting this to work:
- The generated code was not usable in some scenarios. Read more about that and the adopted solution in these Swagger notes on GitHub.
- In addition to the general approach used, we had to innovate further and resolve the hurdles. That's where the interceptor was leveraged.
How To Setup
Follow the steps in this GitHub repo. There is a README.md and Setup.md. To summarize, these are the steps.
- Clone the project.
- Maven-build the project.
- Download the ZIP files and license files of PingFederate, PingDirectory.
- Download a MySQL connector JAR file, also.
- Verify the downloads.
- Configure MySQL root user credentials.
- Install and start PingDirectory and PingFederate using provided Ant script.
- Launch the PingFederate Admin console for the first time.
- Maven-build the project with the additional option of generating the Admin API Client code.
- Use the generated Admin API Client code to administer PingFederate.
The code is available on the Git repository. However, let's discuss some code below for better visualization:
Java
public  void setup() throws NoSuchAlgorithmException, KeyManagementException,
  FileNotFoundException, IOException {
        String ldapDsId="MyLDAP";
        String formAdapterid="HTMLFormAdapter";
        String passwordValidatorId="PasswordValidator";
         String atmId1="testingATM1";
         String policyId1="testingpolicy1";
         String ldapAttributeSourceId="mypingfedldapds";
         String atmId2="testingATM2";
        Properties mySqlProps = PropertiesUtil.loadProps(new File("../mysql.properties"));
        this.setupDb(mySqlProps);

        new LdapCreator(core)
          .createLdap(ldapDsId, "MyLdap", "localhost", "cn=Directory Manager", "manager");

        PasswordCredentialValidator passwordCredentialValidator = new PasswordCredentialValidatorCreator(core)
          .createPasswordCredentialValidator(
                ldapDsId, passwordValidatorId, passwordValidatorId, "uid=${username}");


          IdpAdapter idpAdapter1 = new IdpAdapterCreator(core)
            .createIdpAdapter( passwordValidatorId, formAdapterid,
                 new String[] {"givenName", "mail", "sn", "uid"}, new String[]{"uid"}, "uid");

          IdpAdapterMapping createdIdpAdapterMapping = new IdpAdapterMappingCreator(core).createIdpAdapterGrantMapping(formAdapterid, "username");

         new JwtAtmCreator(core)
           .createJWTATM( atmId1, "jwtatm1", 120, 1, AutomationSharedConstants.AtmOauth_PersistentGrantUserKeyAttrName, "iat", "nbf");

         new AtmMappingCreator(core)
           .createTokenMappings( "jwtatm1mapping", AccessTokenMappingContext.TypeEnum.IDP_ADAPTER, formAdapterid, atmId1,
                 new AccessTokenMappingAttribute(null, AutomationSharedConstants.AtmOauth_PersistentGrantUserKeyAttrName, SourceTypeIdKey.TypeEnum.OAUTH_PERSISTENT_GRANT, "USER_KEY"),
                 new AccessTokenMappingAttribute(null, "iat", SourceTypeIdKey.TypeEnum.EXPRESSION, "#iat=@org.jose4j.jwt.NumericDate@now().getValue()"),
                 new AccessTokenMappingAttribute(null, "nbf", SourceTypeIdKey.TypeEnum.EXPRESSION, "#nbf = @org.jose4j.jwt.NumericDate@now(), #nbf.addSeconds(10), #nbf = #nbf.getValue()")

                );

         new JwtAtmCreator(core)
           .createJWTATM(atmId2, "jwtatm2", 5, 2, "iss", "sub", "aud", "nbf", "iat");
         new AtmMappingCreator(core)
           .createTokenMappings("jwtatm2mapping", AccessTokenMappingContext.TypeEnum.CLIENT_CREDENTIALS, null, atmId2,
                 new AccessTokenMappingAttribute(null, "iss", SourceTypeIdKey.TypeEnum.EXPRESSION, "#value = #this.get(\"context.HttpRequest\").getObjectValue().getRequestURL().toString(), #length = #value.length(), #length = #length-16, #iss = #value.substring(0, #length)"),
                 new AccessTokenMappingAttribute(null, "sub", SourceTypeIdKey.TypeEnum.TEXT, "6a481348-42a1-49d7-8361-f76ebd23634b"),
                 new AccessTokenMappingAttribute(null, "aud", SourceTypeIdKey.TypeEnum.TEXT, "https://apiauthete.ssa.gov/mga/sps/oauth/oauth20/token"),
                 new AccessTokenMappingAttribute(null, "nbf", SourceTypeIdKey.TypeEnum.EXPRESSION, "#nbf = @org.jose4j.jwt.NumericDate@now(), #nbf.addSeconds(10), #nbf = #nbf.getValue()"),
                 new AccessTokenMappingAttribute(null, "iat", SourceTypeIdKey.TypeEnum.EXPRESSION, "#iat=@org.jose4j.jwt.NumericDate@now().getValue()")

                 );

         new ScopesCreator(core).addScopes("email", "foo", "bar");

         new ClientCreator(core)
           .createClient( AutomationSharedConstants.AuthCodeClientId, AutomationSharedConstants.AuthCodeClientId, AutomationSharedConstants.AuthCodeClientSecret, atmId1,
                  true, null, "http://"+AutomationSharedConstants.HOSTNAME+":8080/oidc-hello|http://"+AutomationSharedConstants.HOSTNAME+":8081/login/oauth2/code/pingfed",
                  GrantTypesEnum.AUTHORIZATION_CODE,
                 GrantTypesEnum.ACCESS_TOKEN_VALIDATION);
         new ClientCreator(core)
           .createClient( "manual2", "manual2", "secret", atmId2,
                  true, null, "", GrantTypesEnum.CLIENT_CREDENTIALS);

         Pair<String, String[]>[] scopesToAttributes=new Pair[] {
                 Pair.with("email", new String[] {"email", "family_name", "given_name"})
         };

         new OpenIdConnectPolicyCreator(core)
           .createOidcPolicy( atmId1, policyId1,
                 policyId1, false, false, false, 5,
                 new Triplet [] {
                         Triplet.with("email", true, true),
                         Triplet.with("family_name", true, true),
                         Triplet.with("given_name", true, true)},
                 AttributeSource.TypeEnum.LDAP, ldapDsId, ldapAttributeSourceId, "my pingfed ldap ds",
                 SourceTypeIdKey.TypeEnum.LDAP_DATA_STORE,
                 new Pair[] {
                         Pair.with("sub", "Subject DN"),
                         Pair.with("email", "mail"),
                         Pair.with("family_name", "sn"),
                         Pair.with("given_name", "givenName")
                 },
                 scopesToAttributes, true, true, "uid=${"+AutomationSharedConstants.AtmOauth_PersistentGrantUserKeyAttrName+"}",
                 "/users?uid=${"+AutomationSharedConstants.AtmOauth_PersistentGrantUserKeyAttrName+"}");

    }
The above is an actual code snippet used by me to administer the PingFederate.
As an example, let's look at what is happening in the LdapCreator class createLdap method.
Java
public  DataStore createLdap(String id, String name, String hostName, String userDn, String password) {
        DataStoresApi dataStoresApi= new DataStoresApi(core.getApiClient());
        core.setRequestTransformBeans(new TransformBean("type",type->TypeEnum.LDAP.name()));
        core.setResponseTransformBeans(new TransformBean("type",type->type.charAt(0)+type.substring(1)
                                                         .toLowerCase()+"DataStore"));

        LdapDataStore ldapDataStore = new LdapDataStore();
        List<String> hostNames = addStringToNewList(hostName);
        ldapDataStore.setHostnames(hostNames);
        ldapDataStore.setType(TypeEnum.LDAP);
        ldapDataStore.setId(id);
        ldapDataStore.setName(name);
        ldapDataStore.setLdapType(LdapTypeEnum.PING_DIRECTORY);
        ldapDataStore.setUserDN(userDn);
        ldapDataStore.setPassword(password);
        DataStore createdDataStore = dataStoresApi.
          createDataStore(ldapDataStore, false);
        return createdDataStore;
}LdapCreatoris a layer that was written on top of the generated code. The classes DataStoresApi, LdapDataStore, and DataStore are the classes from the generated code.
In the createLdap method, the lines below are how we instruct the interceptor to transform the request and response.
Java
core.setRequestTransformBeans(new TransformBean("type",type->TypeEnum.LDAP.name()));
core.setResponseTransformBeans(new TransformBean("type",
                   type->type.charAt(0)+type.substring(1).toLowerCase()+"DataStore"));
(Again, you can read more about that from the previous link to the Swagger notes on GitHub.)
It did something. How do we know it really worked?
Does It Really Work?
The code base in the repository also contains example code that demonstrates Authorization Code Flow. The example code projects can be set up and run using their Readme.md. The example code projects also serve the purpose of demonstrating that our PingFederate setup worked, in addition to being hopefully useful.
The Example Code Projects
There are two examples:
The example simple-oidc-check is a roll-your-own example. It will demonstrate the Authorization Code Flow and also the Client Credentials grant flow. It can be used to better understand many different concepts including JEE and OIDC. There are some concepts there that might raise your eyebrows and are not so often seen.
The example springboot.oidc.with.angular is an Authorization Code Flow BFF pattern implementation. This is often considered the most secure approach because the access token is kept only at the back end. The access token never reaches the JavaScript/HTML layer. This and other approaches are also discussed in the example code Readme.md.
Supported Versions The versions of PingFederate supported by this utility are detailed here.
Future Vision I created this utility mainly because it helped me stand up my PingFed PoCs rapidly when working on a client project.
I will try maintaining it as long as it does not tax me too much and PingFederate itself does not provide similar solutions. I can already think of some more improvements and enhancements. I can be encouraged to maintain and carry on with it with stars, likes, clones, etc. on the Git repository.
